
|
|
Articles
Organize Your Desktop In A Neat Way!
1. Introduction
![]() Anyone familiar with computers has at least once faced a situation when you have several windows open and you suddenly need
to double-click a shortcut which happens to be hidden behind all these windows on the desktop. Of course, you can always
hide them with 'Show desktop' button but it surely takes time.Wouldn't it be more comfortable to have a
certain area of your desktop devoted to important shortcuts and never covered by opening windows?
Anyone familiar with computers has at least once faced a situation when you have several windows open and you suddenly need
to double-click a shortcut which happens to be hidden behind all these windows on the desktop. Of course, you can always
hide them with 'Show desktop' button but it surely takes time.Wouldn't it be more comfortable to have a
certain area of your desktop devoted to important shortcuts and never covered by opening windows?
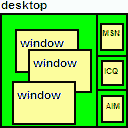 Or, let us assume you are well into online communication, no matter whether personal or business. MSN/ICQ/AIM/Yahoo/etc.
instant messengers are constantly on your desktop, and you would most certainly prefer to have them organized
in such a way that none of them overlaps the others, and they as a whole are never overlapped with other program windows.
Or, let us assume you are well into online communication, no matter whether personal or business. MSN/ICQ/AIM/Yahoo/etc.
instant messengers are constantly on your desktop, and you would most certainly prefer to have them organized
in such a way that none of them overlaps the others, and they as a whole are never overlapped with other program windows.
 May be you belong to a corporate users group and as a result work daily with a constant set of applications or you have a
certain set of websites you deal with all the time? Then it'd be most comfortable for you to have certain
areas of your desktop attached to certain application or site windows. Wouldn't it be even more attractive to be able to configure specific
settings not only for application windows, but for the windows with particular documents by the window title? You'll finally
be able to actually organize your desktop in a neatest way!
May be you belong to a corporate users group and as a result work daily with a constant set of applications or you have a
certain set of websites you deal with all the time? Then it'd be most comfortable for you to have certain
areas of your desktop attached to certain application or site windows. Wouldn't it be even more attractive to be able to configure specific
settings not only for application windows, but for the windows with particular documents by the window title? You'll finally
be able to actually organize your desktop in a neatest way!
Actual Window Manager
|
2. What Actual Window Manager Offers
Actual Window Manager special functions allow you:
- automatic setting the initial window size in absolute units (pixels) or relative units (percent of an appropriate current monitor's or desktop's dimensions)
- automatic setting the initial window position on the desktop, with possible window alignment along any of desktop side or its center
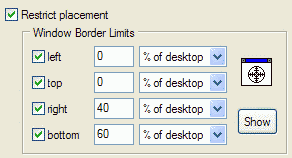
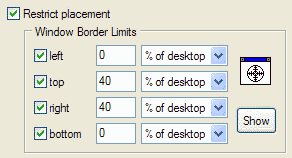
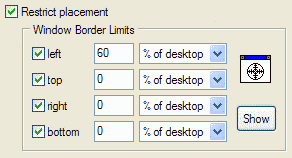
- restricting the placement on the desktop for
your windows. Here you can set certain limits for each of the four window sides or their combination, thus dividing your
desktop into allowed and restricted areas for a certain window. The pictures below represent different restrictions
combinations and both restricted and allowed areas they create:
a) all sides 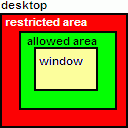
b) left and top 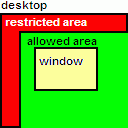
c) right side only 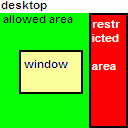
d) top and bottom 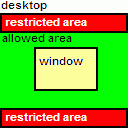
You can either set restrictions for all windows or set specific restrictions for particular program windows, which means you can easily divide your desktop into areas each of which will belong to a certain program window. You can also disable the restrictions on-the-fly, which allows you, whenever there is such a necessity, to move a window to any place of the desktop meeting the demands of a particular situation. When the restrictions are enabled once again, the window will occupy the allowed area automatically. Additionally, if a window is assigned with certain placement restrictions then its auto alignment will proceed according to those restrictions, which means the window will be aligned inside the allowed area and not the whole desktop.
Important note! When setting the restrictions you should have in mind that actually they are margins - i.e. the left/top restriction values are measured fr om the left/top desktop border, while the right/bottom restriction values are measured fr om the right/bottom desktop border.
3. Examples
We'd like to list here several examples of Actual Window Manager functions' usage:
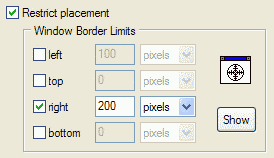
- To define a vertical area at the right side of desktop that will host constantly used shortcuts you should:
- select Default settings
- go to the Position property sheet
- turn on the Restrict placement checkbox, then turn on the right side restriction (right checkbox)
and specify the restricted area width, e.g. 200 pixels:
- To assign separate zones for MSN Messenger, ICQ, Yahoo! Messenger contact lists you need to:
- create specific settings (or use the one already provided) for MSN Messenger
- turn on the Restrict placement checkbox in the Position property sheet of these settings
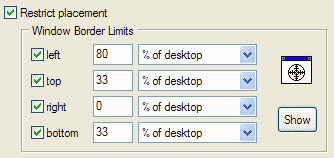
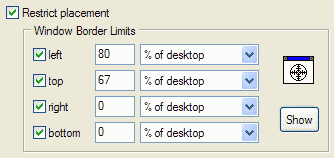
- turn on the restrictions for all four sides and assign, for example, the following values:
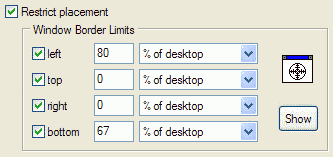
- create specific settings (or use those already provided) for ICQ
- turn on the Restrict placement checkbox in the Position property sheet of these settings
- turn on the restrictions for all four sides and assign, for example, the following values:
- create specific settings (or use those already provided) for Yahoo! Messenger
- turn on the Restrict placement checkbox in the Position property sheet of these settings
- turn on the restrictions for all four sides and assign, for example, the following values:
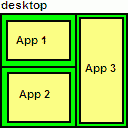
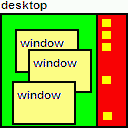
- To show how the workspace can be organized we'll take the example of a user whose business needs make
him every day, via Internet Explorer, access three pages of a corporate web application: Customers, Orders and
Transactions. Let us assume these three windows are to be arranged on the desktop the way it is shown on the
picture below:
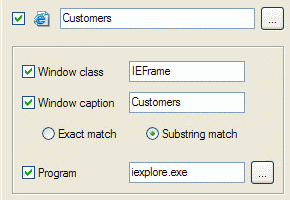
They are also to be fixed in their places so that the user won't accidentally ruin workspace configuration. That means you should:- create
specific settings for the Customers web page and
provide the following values in their
Target Window pane:
- provide, for example, the following restriction settings for these settings:
- similarly create specific settings for the Orders web page but provide the Orders value for Window caption in the Target Window pane of these settings
- provide, for example, the following restriction settings for this rule:
- similarly create specific settings for the Transactions web page but provide the Transactions value for Window caption in the Target Window pane of these settings
- provide, for example, the following restriction settings for this rule:
- create
specific settings for the Customers web page and
provide the following values in their
Target Window pane:
4. Conclusion
Actual Window Manager will make your work with windows extremely simple and convenient. It will help you to save your time and efforts. It has more than 40 productivity tools which you can use to control every window on your screen. It is an ideal solution for those who multi-task in multiple applications.
5. Useful Links
See the following links that will be your guides in getting acquainted with Actual Window Manager:
- Download the fully-functional 60-days trial version of Actual Window Manager right now. It is completely free!
- Actual Window Manager Home the official page wh ere you can download or order the risk-free version and read what users say about Actual Window Manager.
- Actual Window Manager Help section the full list of features available in Actual Window Manager.
- Here you can find the information on how to create specific settings for any window.
Check out our articles. You can find other ways for using the features presented by Actual Window Manager which are sure to make your work easier!


How to make your computer work faster
Adjust finely the priority of your programs with Actual Tools software.

How to find a folder to which Skype saves received files and open it in 2 clicks
With the latest updates, Skype no longer prompts the user to save a file somewhere, but immediately saves all files to a specially designated folder, and finding the folder to move files fr om it to another directory, or open them with an application other than that set by default, is sometimes a difficult task.
We are present you the perfect solution to this problem
Independent Virtual Desktops on Multiple Monitors
Learn how to create and manage virtual desktops independently on each monitor in a multiple display environment.
Use Actual Window Manager to hide SSH tunnels to system tray
If you use SSH tunnels to allow access through a firewall, or just to encrypt your communication, you might get sick of the proliferation of tasks littering your bar. It is very easy, however, to use Actual Window Manager to automatically clear these up.

Meet the New Slideshow Screen Saver for Multiple Monitors
Actual Tools released the new slideshow screen saver for Actual Multiple Monitors and Actual Window Manager. This screen saver, in contrast to the default one, allows setting its own slideshow for each monitor.

Get fully functional Recycle Bin on your Taskbar
Lear about how to put a fully functional Recycle Bin on your taskbar

Dual Monitor Set Up
How to Setup Dual Monitor.
-
How to make a window always stay on top with a single click
The Stay Always-on-Top feature brings the window to the top of the desktop and doesn't allow other windows to hide it.

How to Run Windows Store App in a Window on Desktop
New feature in Actual Multiple Monitors transforms Modern/Metro apps to conventional resizable windows on user’s desktop.
-
Find the best way to minimize Outlook Express to the icon in tray
Just one click on Minimize To Tray title button and Outlook Express is minimized to the system tray. Just another click on tray icon and Outlook Express is restored and is ready to use again!
