
|
|
Window Menu
Available in: Actual Window Manager, Actual Multiple Monitors, Actual Virtual Desktops, Actual Title Buttons, Actual Window Menu, Actual Transparent Window, Actual Window Minimizer, Actual Window Rollup.
The Window Menu trigger allows you the supplement of Windows system window menu with easy, right-click context menu access to most of the enhanced window actions available in Actual Tools programs.
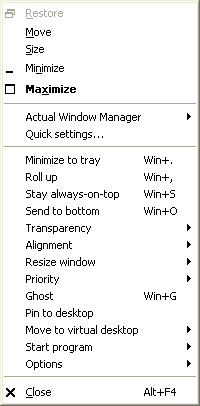
These new context menu options include:
Manage window settings - displays the Manage Window Settings submenu with special commands and the information about the currently applied settings.
Quick window settings... - left-click this option to invoke the Quick Window Settings dialog.
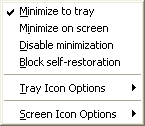
AltMin - displays a submenu for selecting alternative minimization methods, adjusting tray or screen icon options, disabling minimization at all or preventing a window from being automatically restored by its application:
Roll Up - left-click this option to roll a window up to its title bar. Left-click it again to unroll a window back to its normal size.
Stay Always-On-Top - left-click this option to place and keep a window always on top of others. Left-click it again to let a window be covered by others.
Send to Bottom - left-click this option to place a window under (or behind) all the others.
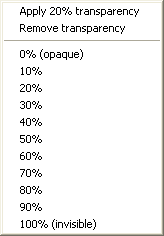
Transparency - displays a submenu that allows you changing window's transparency to a defined level, select from a range of pre-defined levels, or disable the transparency effect altogether:
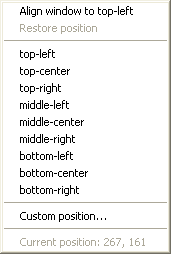
Alignment - displays a submenu that allows you the choice from one of 9 pre-defined methods of window alignment:
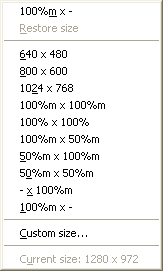
Resize Window - displays a submenu that allows you either choosing from a range of pre-defined window sizes or defining a custom size on-the-fly to resize your window:
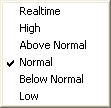
Priority - displays a submenu with the list of available priority values where you can view the current priority setting and change it as circumstances require:
Ghost - left-click this option to "ghost" a window. Left-click it again to restore the window to its normal state.
Note
When window is ghosted you can't call its window menu by clicking on its title bar because ghosted window will pass all the mouse clicks through. In such case you should either right-click window's taskbar button to call its window menu or temporarily unghost it to make its title bar operational again.Move to Monitor n/Move to... - this item's look and work depends on the actual number of monitors you have: for two monitors, it will look as Move to Monitor 1/2 and will place the window onto another monitor; for more than two monitors, it will look as Move to... and will pop up the special Monitor Selector dialog window.
Note
This command will be visible only if you have more than one monitor attached to your Windows desktop.Placement restrictions - this option is added automatically if you enable the placement restrictions for a window. Use it to suspend the defined placement restrictions and move/resize your window freely as circumstances require. After that, you can restore the defined restrictions back, and your window will be placed within the allowed area automatically and, if needed, reduced to fit within it.
Pin to desktop - this option is added automatically if you pin a window to desktop. Use it toggle the "pinned/unpinned" state of window in case you need to handle this window as usual.
Move to Virtual Desktop - displays a submenu with the list of currently available virtual desktops and the special "All desktops" item:
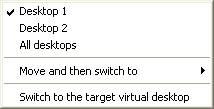
Selecting any of these items will move a window to item's corresponding virtual desktop or make it visible on all desktops.
Start program - displays a submenu with the list of currently available pre-defined shortcuts:
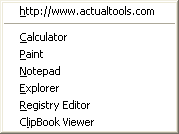
Selecting any of these items will start item's corresponding program..
Snap - toggles the classing snapping on/off.
Maximize to desktop - maximizes a window to entire desktop.
Note
This command will be visible only if you have more than one monitor attached to your Windows desktop.Mirror - displays a submenu with the mirror control commands:
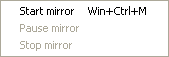
Using these commands, you can start/stop window mirror or suspend its refreshment.
Put into... - opens the special preview window, which allows spanning several selected tiles:
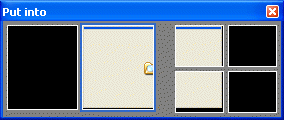
Select the desired tiles, which you would like to stretch a window to, as if you select files in a folder: press the left mouse button on a monitor and drag the mouse (without releasing the left button) over desired tiles (the window preview will show you the expected window size). After selecting all desired tiles, release the left button to apply the action.
Note
This command will be visible only if the Desktop Divider facility is enabled.Show clipboard templates - pops up a menu with the list of currently available clipboard templates.
Switch audio playback to device - displays a submenu where you can change the mode of audio redirection in a subject multimedia application.
Note
This command will be visible only if the Audio Switcher facility is enabled.
