
|
|
Tile Layouts Panel
Available in: Actual Window Manager, Actual Multiple Monitors.
The Tile Layouts panel allows maintaining the layouts of the Desktop Divider facility.
Tile Layouts toolbar - is related to the Tile Layouts list box and contains the buttons for the following commands:
 Add Item button
- click it to add a new tile layout.
Add Item button
- click it to add a new tile layout.
 Delete Item button
- click it to delete the tile layout selected in the Tile Layouts list box.
Delete Item button
- click it to delete the tile layout selected in the Tile Layouts list box.
 Copy Item button
- click it to add a new tile layout which will be a copy of the tile layout selected in the Tile Layouts list box.
Copy Item button
- click it to add a new tile layout which will be a copy of the tile layout selected in the Tile Layouts list box.
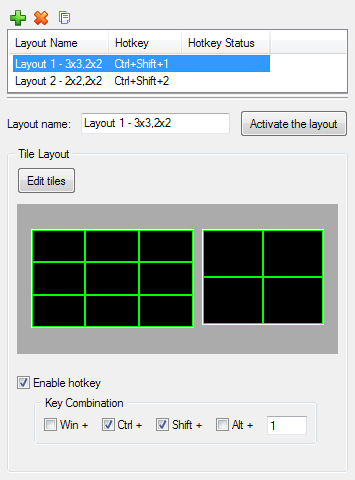
Tile Layouts list box - shows the list of currently available tile layouts and contains the following columns:
Layout Name column - displays the name of a layout;
Hotkey column - displays the key combination assigned to a layout;
Hotkey Status column - displays the status of the hotkey.
Below the list is the group of controls allowing you to view and adjust the properties of the tile layout selected in the list box:
Layout name edit box - here you can specify or modify layout's name. We suggest to specify significant and self-explanatory identifiers for new layouts so that you could easily tell them apart later;
Activate the layout button - click it to make the selected tile layout active (you can also activate layouts either via Desktop Divider popup menu or via Desktop context menu);
Tile Layout group of controls - contains the following visual controls:
Edit tiles button - click it to open the Tiles Editor window where you can visually create and adjust the number of tiles and their sizes. In the preview control below you can see the current state of the layout;
Enable hotkey check box - mark it to assign a custom key combination to the tile layout for its quick activation;
Key Combination group - contains the visual controls that allow modifying the assigned key combination (these controls work exactly the same as here).
