
|
|
Title Buttons
Available in: Actual Window Manager, Actual File Folders, Actual Multiple Monitors, Actual Virtual Desktops, Actual Title Buttons, Actual Transparent Window, Actual Window Minimizer, Actual Window Rollup.
The Title Buttons trigger allows the supplement of Windows®' standard set of system
![]() Minimize, Maximize/Restore and Close title buttons with an enhanced set of new and
innovative ones. These new buttons provide access to the following Actual Tools programs'
actions:
Minimize, Maximize/Restore and Close title buttons with an enhanced set of new and
innovative ones. These new buttons provide access to the following Actual Tools programs'
actions:
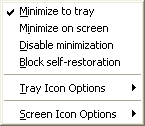
 AltMin - left-click this button to
minimize a window by a user-configured method other than Windows®' default
minimize to taskbar. Right-click this button to display a list of context menu options where you can select
on-the-fly the best minimization method for a given
situation, adjust minimization options, or cancel minimization
capability altogether:
AltMin - left-click this button to
minimize a window by a user-configured method other than Windows®' default
minimize to taskbar. Right-click this button to display a list of context menu options where you can select
on-the-fly the best minimization method for a given
situation, adjust minimization options, or cancel minimization
capability altogether:
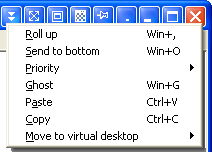
 Roll Up - left-click this button to
roll a window up. Left-click it again to unroll the window.
Roll Up - left-click this button to
roll a window up. Left-click it again to unroll the window.
 Stay Always-on-Top - left-click this button to
place and keep a window always on top of others. Left-click it again to let a window be
covered by others.
Stay Always-on-Top - left-click this button to
place and keep a window always on top of others. Left-click it again to let a window be
covered by others.
 Send to Bottom - left-click this
button to place a window under (or behind) all the others.
Send to Bottom - left-click this
button to place a window under (or behind) all the others.
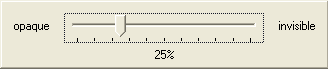
 Make Transparent -
left-click this button to make a window transparent of a
defined level. Left-click it again to restore the previous
transparency level. Right-click this button to display the trackbar control that allows you quickly and easily setting the
desired transparency level on-the-fly - drag the slider to see the effect:
Make Transparent -
left-click this button to make a window transparent of a
defined level. Left-click it again to restore the previous
transparency level. Right-click this button to display the trackbar control that allows you quickly and easily setting the
desired transparency level on-the-fly - drag the slider to see the effect:
 Align - left-click this button to
align a window in the manner specified in the Configuration Module. Left-click it again to
move a window back to its previous position. Right-click this button to display a list of context menu options where you
can select from the full range of alignment methods available:
Align - left-click this button to
align a window in the manner specified in the Configuration Module. Left-click it again to
move a window back to its previous position. Right-click this button to display a list of context menu options where you
can select from the full range of alignment methods available:

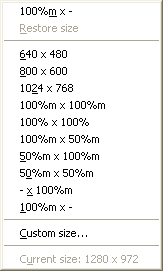
 Resize - left-click this button to
resize a window to the user-defined default specified in the Configuration Module.
Left-click it again to restore window's previous size. Right-click this button to display a list of context
menu options where you can either select from a full range of pre-defined sizes or specify custom window dimensions
on-the-fly as circumstances require:
Resize - left-click this button to
resize a window to the user-defined default specified in the Configuration Module.
Left-click it again to restore window's previous size. Right-click this button to display a list of context
menu options where you can either select from a full range of pre-defined sizes or specify custom window dimensions
on-the-fly as circumstances require:
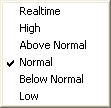
 Change Program Priority - left-click
this button to change the execution priority level to the user-defined default specified in the
Configuration Module. Right-click this button to display its context menu with the list of available priority
values where you can view the current priority setting and change it as circumstances require:
Change Program Priority - left-click
this button to change the execution priority level to the user-defined default specified in the
Configuration Module. Right-click this button to display its context menu with the list of available priority
values where you can view the current priority setting and change it as circumstances require:
 Ghost - left-click this button to
"ghost" a window.
Note
Ghost - left-click this button to
"ghost" a window.
Note
When window is ghosted you can't click this button again to cancel the ghost mode because ghosted window will pass all the mouse clicks through. In such case you should temporarily unghost it to make its title bar operational again. Move to Monitor -
left-click this button to move a window to the monitor that is assigned in your
system as next to that one the desired window currently resides on. Right click on this button invokes the
Monitor Selector dialog window.
Note
Move to Monitor -
left-click this button to move a window to the monitor that is assigned in your
system as next to that one the desired window currently resides on. Right click on this button invokes the
Monitor Selector dialog window.
Note
This button will be visible only if you have more than one monitor attached to your Windows desktop. Move to Virtual Desktop -
click (either left or right) this button to display a menu with the list of currently available
virtual desktops and the special "All desktops" item:
Move to Virtual Desktop -
click (either left or right) this button to display a menu with the list of currently available
virtual desktops and the special "All desktops" item:
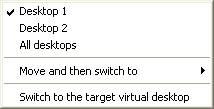
Selecting any of these items will move a window to item's corresponding virtual desktop or make it visible on all desktops.
 Start Program -
left click this button to launch its associated program. Right click this button to
display a menu with the list of currently available
pre-defined shortcuts:
Start Program -
left click this button to launch its associated program. Right click this button to
display a menu with the list of currently available
pre-defined shortcuts:
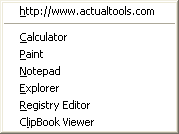
Selecting any of these items will start item's corresponding program.
 Cut to Clipboard -
left-click this button to cut the data (either text, graphics or object) currently selected in a window to the
clipboard. Using this button (and its
relatives described below) to operate with the clipboard is far more quicker than using the commands of the same name
in window's Edit menu, especially when using such alternative input device as touch screen (for example, on Tablet PC).
Cut to Clipboard -
left-click this button to cut the data (either text, graphics or object) currently selected in a window to the
clipboard. Using this button (and its
relatives described below) to operate with the clipboard is far more quicker than using the commands of the same name
in window's Edit menu, especially when using such alternative input device as touch screen (for example, on Tablet PC).
 Copy to Clipboard -
left-click this button to copy the data (either text, graphics or object) currently selected in a window to the
clipboard. Right-click this button to
display a menu:
Copy to Clipboard -
left-click this button to copy the data (either text, graphics or object) currently selected in a window to the
clipboard. Right-click this button to
display a menu:
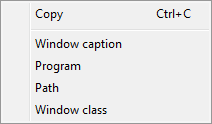
Selecting the Copy item works the same as the left click, other items store certain window information in the clipboard.
 Paste from Clipboard -
left-click this button to paste into a window the data (either text, graphics or object) that was previously
stored to the clipboard (either with the
Cut to Clipboard button, Copy to Clipboard button
or somehow else).
Paste from Clipboard -
left-click this button to paste into a window the data (either text, graphics or object) that was previously
stored to the clipboard (either with the
Cut to Clipboard button, Copy to Clipboard button
or somehow else).
 Maximize to Desktop -
left-click this button to maximize a window to entire desktop. Next click will restore the window back. Right-click
this button to open the special preview window which allows spanning the selected monitors only:
Maximize to Desktop -
left-click this button to maximize a window to entire desktop. Next click will restore the window back. Right-click
this button to open the special preview window which allows spanning the selected monitors only:
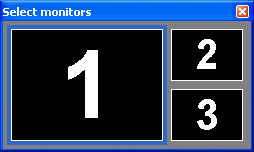
Select the target monitors which you would like to stretch a window to, as if you select files in a folder: press the left mouse button on a monitor and drag the mouse (without releasing the left button) over desired monitors (the window preview will show you the expected window size). After selecting all desired monitors, release the left button to apply the action.
Note
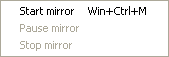
This button will be visible only if you have more than one monitor attached to your Windows desktop. Mirror - left-click
this button to run a window mirror for a window. Right-click this button to display its context menu
with the mirror control commands:
Mirror - left-click
this button to run a window mirror for a window. Right-click this button to display its context menu
with the mirror control commands:
 Put into Divider Tile -
left-click this button to put a window into the nearest Desktop Divider tile
(next clicks will cycle the window through the tiles on the current monitor).
Right-click this button to open the special preview window, which allows spanning several selected tiles:
Put into Divider Tile -
left-click this button to put a window into the nearest Desktop Divider tile
(next clicks will cycle the window through the tiles on the current monitor).
Right-click this button to open the special preview window, which allows spanning several selected tiles:
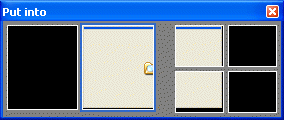
Select the desired tiles, which you would like to stretch a window to, as if you select files in a folder: press the left mouse button on a monitor and drag the mouse (without releasing the left button) over desired tiles (the window preview will show you the expected window size). After selecting all desired tiles, release the left button to apply the action.
Note
This button will be visible only if the Desktop Divider facility is enabled. Recent Folders -
left-click this button to show a menu with the list of recently visited folders:
Recent Folders -
left-click this button to show a menu with the list of recently visited folders:
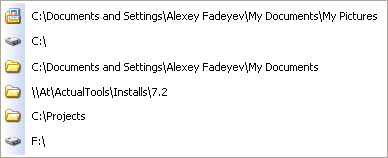
Select the desired folder to make it the current folder immediately in any of the supported windows.
 Favorite Folders -
left-click this button to show a menu with the list of your favorite folders
(i.e. those you are working most of the time):
Favorite Folders -
left-click this button to show a menu with the list of your favorite folders
(i.e. those you are working most of the time):
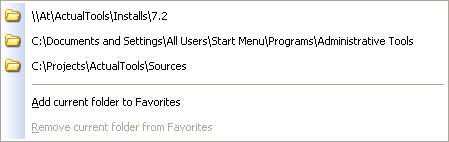
Select the desired folder to make it the current folder immediately in any of the supported windows.
 Switch Audio Playback to Device -
left- or right-click this button to invoke its context menu where you can change the mode of audio redirection in a
subject multimedia application.
Note
Switch Audio Playback to Device -
left- or right-click this button to invoke its context menu where you can change the mode of audio redirection in a
subject multimedia application.
Note
This button will be visible only if the Audio Switcher facility is enabled. Combo - this button is not available by default,
you need to add it as a custom button. Then you will be able
to customize its combo sequence.
Combo - this button is not available by default,
you need to add it as a custom button. Then you will be able
to customize its combo sequence.
 Unused Buttons - this button is useful
in the case you don't want to overburden your windows' titles with rarely used buttons but nevertheless want to have access
to their functions. Right-click it to call the context menu which contains all the commands of currently unused buttons:
Unused Buttons - this button is useful
in the case you don't want to overburden your windows' titles with rarely used buttons but nevertheless want to have access
to their functions. Right-click it to call the context menu which contains all the commands of currently unused buttons:
You can also left-click this button. First time it will show the same menu as for the right-click but when you select something from this menu the selected function will be assigned to this button so, for example, you will be able to quickly change the transparency as if you would use the normal Make Transparent button. Selecting another function from the context menu will reassign this button to the selected function.
 Manage Window Settings -
use this button to access the window settings commands
in a single click (either left or right). For example, if you need to reset the settings of your window then you can quickly
click this button and select the "Reapply settings" command in the appeared menu. Alternatively, you can easily create the
specific settings for a particular window by clicking this button and then selecting the "Create new specific settings"
command.
Manage Window Settings -
use this button to access the window settings commands
in a single click (either left or right). For example, if you need to reset the settings of your window then you can quickly
click this button and select the "Reapply settings" command in the appeared menu. Alternatively, you can easily create the
specific settings for a particular window by clicking this button and then selecting the "Create new specific settings"
command.
Hint Additional functions available on the right click of some buttons can also be invoked by clicking and holding the left mouse button for some time (about 200 ms). This can be useful if you are using touch screen.
